
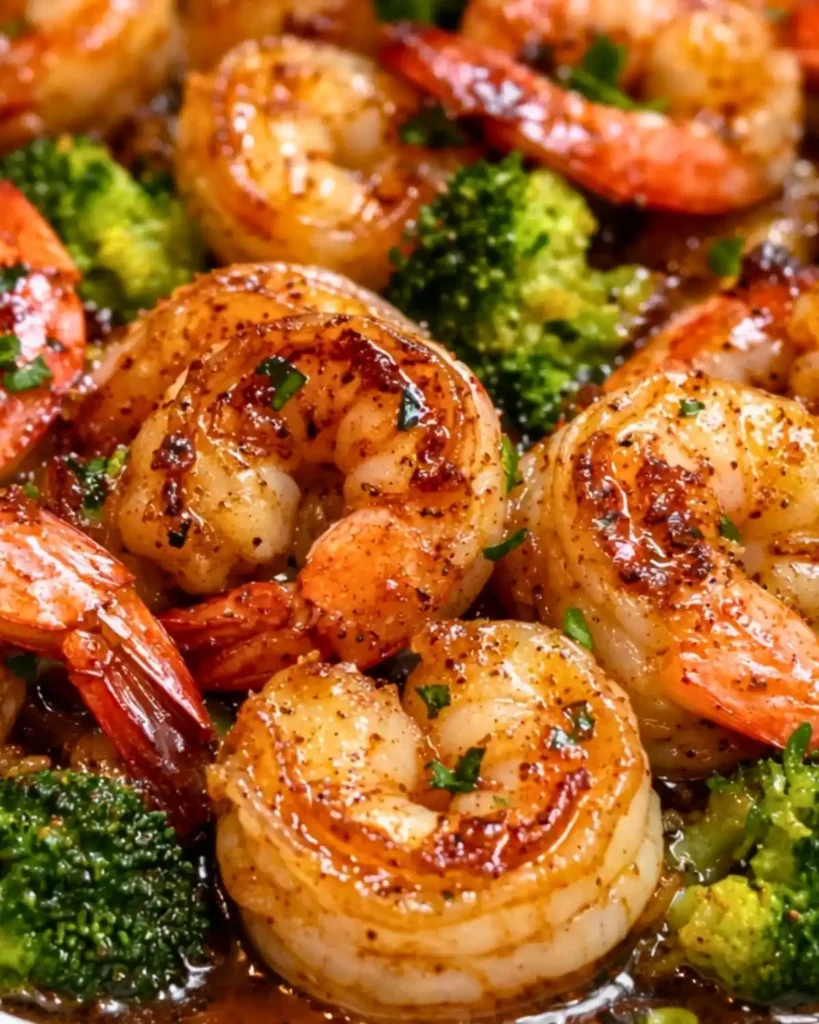
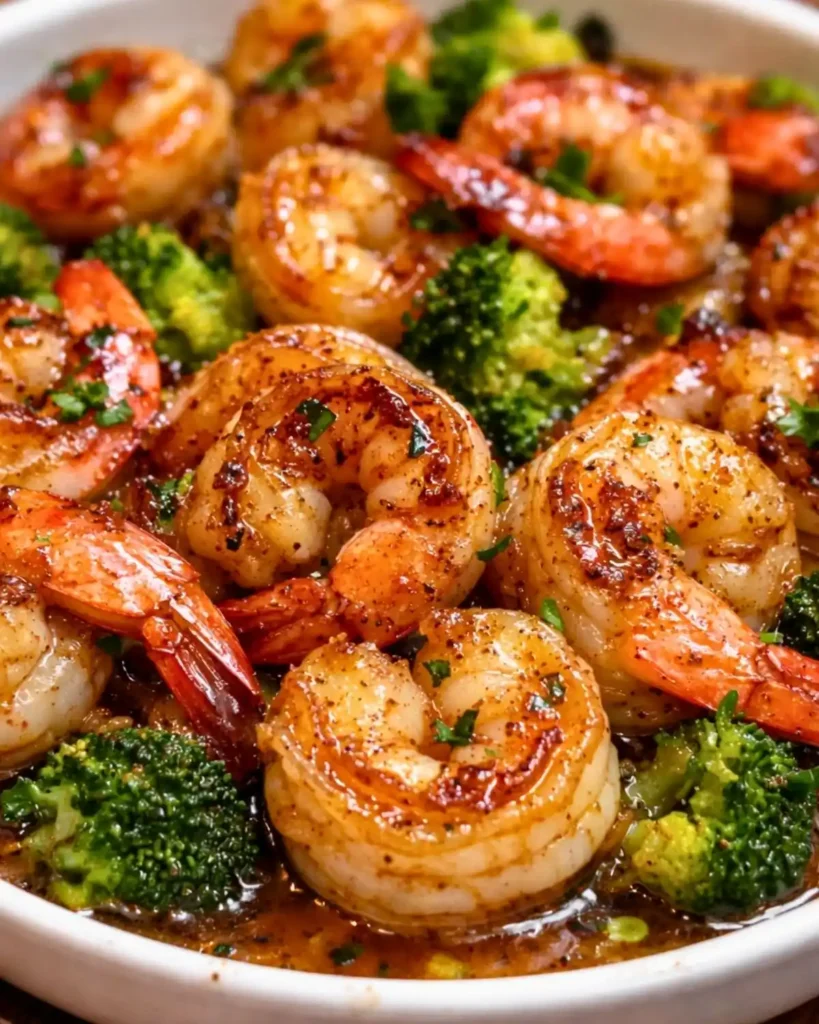
Easy honey garlic shrimp is a restaurant-quality dish that cooks in under 20 minutes on your stovetop. This tender, succulent shrimp is coated in a glossy honey garlic sauce with ginger and soy for an irresistible Asian-inspired flavor profile. The combination of sweet honey, savory soy sauce, and aromatic garlic creates a balanced glaze that clings beautifully to each shrimp.
| Prep Time | 10 minutes |
| Cook Time | 8 minutes |
| Total Time | 18 minutes |
| Servings | 4 |
| Difficulty | Easy |
| Cuisine | Asian-Inspired |
Why This Recipe Works
This honey garlic shrimp recipe delivers restaurant results because it respects the shrimp’s delicate texture while building complex flavor layers. I’ve tested dozens of shrimp recipes over the years, and the key to success is cooking the protein quickly before the sauce reduces. The shrimp finish cooking in just 5-6 minutes total, ensuring they stay tender and juicy rather than becoming rubbery and tough.
The magic happens when you add garlic directly to the hot oil, which blooms the aromatics and creates a fragrant base for the sauce. The honey-soy glaze balances sweetness with umami depth, while ginger and apple cider vinegar add brightness and subtle tang. This combination creates what chefs call “balanced seasoning,” where no single flavor dominates the palate.
Most home cooks struggle with shrimp dishes because they either overcook the shrimp or make a sauce that tastes one-dimensional. By following the exact timing and cooking sequence in this recipe, you’ll achieve perfectly cooked shrimp with a professional glaze every single time.

Ingredients
| Ingredient | Quantity | Notes with Alternatives |
|---|---|---|
| Large shrimp, peeled and deveined | 1 pound | Use 21-30 count shrimp for consistent cooking. Frozen shrimp work well if thawed completely. |
| Olive oil | 2 tablespoons | Use extra-virgin for best flavor. Vegetable or canola oil are acceptable substitutes. |
| Garlic cloves, minced | 4 cloves | Fresh garlic only; jarred garlic adds a metallic taste. Increase to 5 cloves for garlic lovers. |
| Honey | ½ cup | Raw or regular honey both work. Avoid honey with additives for cleaner flavor. |
| Soy sauce | 2 tablespoons | Low-sodium soy sauce reduces overall salt content. Tamari is a gluten-free substitute. |
| Fresh ginger, grated | 1 tablespoon | Use a microplane for fine grating. Never substitute with ground ginger; the flavor is too concentrated. |
| Apple cider vinegar | 1 tablespoon | Rice vinegar or white vinegar work in a pinch, though apple cider provides superior depth. |
| Red pepper flakes | ½ teaspoon (optional) | Adjust to your heat preference. Start with ¼ teaspoon if heat-sensitive. |
| Salt and pepper | To taste | Season shrimp generously before cooking. Kosher salt provides better texture than table salt. |
| Green onions, chopped | For garnish | Use both white and light green parts for garnish. Cilantro is a complementary alternative. |
| Sesame seeds | For garnish | Black or white sesame seeds add visual appeal and nutty flavor. Toast lightly for best results. |
Step-by-Step Instructions
Preparation Phase
- Rinse the large shrimp under cold water to remove excess ice crystals if frozen. Pat completely dry with paper towels, as moisture prevents proper browning and creates steam.
- Season the shrimp generously with salt and pepper on both sides. Allow them to sit at room temperature for 3-5 minutes while you prepare remaining ingredients.
Sauce Preparation
- Whisk together the honey, soy sauce, grated fresh ginger, apple cider vinegar, and red pepper flakes in a small mixing bowl. Stir until honey fully dissolves and combines with other liquids.
Cooking Phase
- Heat the olive oil in a large skillet over medium-high heat until the oil shimmers and moves freely across the pan bottom, approximately 1-2 minutes.
- Add the seasoned shrimp to the hot oil in a single layer. Avoid crowding; cook in batches if necessary. Allow shrimp to cook undisturbed for 2-3 minutes until the bottom side turns pink and develops color.
- Flip each shrimp and cook the opposite side for an additional 2-3 minutes until both sides are pink and the shrimp have curled into a C-shape.
- Stir in the minced garlic and cook for 1-2 minutes, stirring constantly, until the garlic becomes fragrant but does not brown. Burnt garlic creates a bitter, harsh flavor.
Sauce and Finishing Phase
- Pour the prepared honey garlic sauce directly into the skillet with the cooked shrimp. Stir vigorously for 30 seconds to ensure all shrimp are coated evenly with the glaze.
- Allow the mixture to simmer for 1-2 minutes, stirring occasionally, until the sauce thickens slightly and clings to each shrimp. The sauce should coat the back of a spoon.
- Remove the skillet from heat immediately. Transfer the honey garlic shrimp to a serving plate and garnish with chopped green onions and sesame seeds for texture and visual presentation.
Chef Tips for Perfect Results
- Shrimp Size Matters: Use 21-30 count shrimp for this recipe. Larger shrimp require more cooking time and may become tough, while smaller shrimp cook too quickly and may be difficult to coat evenly with sauce.
- Achieve the Perfect Sear: Pat shrimp completely dry before cooking. Moisture is the enemy of browning; even a thin film of water creates steam that prevents color development on the exterior.
- Don’t Overcrowd the Pan: Arrange shrimp in a single layer with space between each piece. This ensures even cooking and allows heat to contact all sides, not just the bottom.
- Bloom the Garlic Properly: Add garlic to the hot oil after shrimp are cooked, not before. This prevents garlic from burning while you cook the shrimp, which would create an acrid, unpleasant flavor.
- Control the Sauce Thickness: If sauce seems too thin after 2 minutes, simmer an additional 30-60 seconds. If it reduces too much, add 1-2 tablespoons of water to loosen it before serving.
- Garnish at Service: Add green onions and sesame seeds only at the end, just before serving. This keeps them fresh and crunchy rather than wilting into the warm sauce.
Common Mistakes to Avoid
Overcooking the Shrimp: The most frequent error is cooking shrimp past the point of doneness, resulting in rubbery, tough texture. Shrimp transition from translucent to opaque and pink in just 5-6 minutes total. The shrimp continues cooking slightly after removing from heat, so remove them when they’re nearly done. Use a meat thermometer if unsure; shrimp reach a safe internal temperature of 145°F.
Skipping the Pat-Dry Step: Many cooks rinse shrimp and immediately add them to the pan. Surface moisture creates steam, which prevents browning and creates a pale, unappealing appearance. Your fix is simple: place rinsed shrimp on paper towels for 5 minutes before cooking.
Using Ground Ginger Instead of Fresh: Ground ginger is concentrated and creates an overpowering, harsh flavor that dominates the honey garlic profile. Fresh ginger adds brightness without overwhelming other flavors. Always microplane or finely mince fresh ginger for this recipe.
Adding Garlic Too Early: Adding garlic to the cold oil or adding it before the shrimp finishes cooking allows it to burn. Burnt garlic tastes bitter and metallic, ruining the entire dish. Add garlic only after the shrimp are nearly cooked, then cook just until fragrant.
Making the Sauce Too Thin or Too Thick: A sauce that’s too thin slides off the shrimp, while one that’s too thick creates a cloying coating. The sauce should simmer for 1-2 minutes until it coats the back of a spoon but still flows slightly. Adjust by adding water to thin or continuing to simmer to thicken.
Variations and Substitutions
| Ingredient | Substitution | Impact on Flavor |
|---|---|---|
| Honey | Maple syrup or agave nectar | Maple adds earthy richness; agave remains subtle. Both work well but add distinct flavor notes. |
| Soy sauce | Tamari or coconut aminos | Tamari provides identical umami and is gluten-free. Coconut aminos are lighter with subtle sweetness. |
| Apple cider vinegar | Rice vinegar or white vinegar | Rice vinegar is milder and slightly sweet. White vinegar is sharper and more acidic. |
| Fresh ginger | Ginger paste or additional garlic | Ginger paste is more concentrated; use ½ teaspoon. Additional garlic shifts focus to savory profile. |
| Red pepper flakes | Sriracha or fresh chili | Sriracha adds heat plus garlic depth. Fresh chili provides heat with herbal notes. |
| Olive oil | Sesame oil or coconut oil | Sesame oil adds nutty Asian character. Coconut oil adds subtle tropical sweetness. |
| Green onions | Cilantro or parsley | Cilantro adds fresh, citrus notes. Parsley is mild and doesn’t compete with sauce. |
Serving Suggestions and Pairings
Serve easy honey garlic shrimp over steamed jasmine rice to absorb the glossy sauce. The fragrant, slightly sweet rice complements the honey garlic glaze without competing for attention. For a lower-carb option, serve over cauliflower rice or with zucchini noodles tossed in sesame oil.
Pair this dish with stir-fried vegetables like broccoli, snap peas, or bell peppers for a complete meal. Cook vegetables separately and combine just before serving to maintain crisp texture. This transforms easy honey garlic shrimp into a restaurant-quality stir-fry suitable for weeknight dinners.
For entertaining, arrange honey garlic shrimp on a bed of sautéed baby bok choy with steamed broccoli florets. Add a side of white or brown rice, and you have an elegant dinner that cooks in 20 minutes. This presentation impresses guests without requiring extensive preparation or cleanup.
Serve honey garlic shrimp as an appetizer on skewers with sesame seeds for garnish. This works perfectly for dinner parties, family gatherings, or casual entertaining. Guests enjoy the bold flavors and quick preparation, and the skewers are easy to handle while mingling.
Create a bowl-style meal by combining honey garlic shrimp with jasmine rice, shredded cucumber, sliced avocado, and a drizzle of extra sauce. Add crispy shallots or wonton strips for crunch. This versatile dish works for meal prep and tastes delicious at room temperature the next day.
Storage and Reheating
| Method | Duration | Instructions |
|---|---|---|
| Refrigerator Storage | 3-4 days | Place cooled shrimp and sauce in an airtight container. Store on a shelf, not in the door, to maintain consistent temperature. |
| Stovetop Reheating | 3-5 minutes | Place shrimp and sauce in a skillet over medium heat. Stir occasionally until heated through. Add 1-2 tablespoons water if sauce seems too thick. |
| Microwave Reheating | 2-3 minutes | Transfer to a microwave-safe container. Heat on 50% power in 1-minute intervals, stirring between each. This prevents shrimp from overcooking further. |
| Freezer Storage | Up to 2 months | Cool completely and transfer to a freezer-safe container or bag. Flatten the bag to save space. Thaw overnight in the refrigerator before reheating. |
| Do Not Reheat in Oven | N/A | Oven heat causes shrimp to continue cooking and become tough. Use stovetop or microwave only. |
Nutritional Information
Approximate values per serving (1 pound shrimp serves 4).
| Nutrient | Amount per Serving |
|---|---|
| Calories | 285 |
| Protein | 22g |
| Total Fat | 9g |
| Saturated Fat | 1.5g |
| Carbohydrates | 32g |
| Dietary Fiber | 0g |
| Sugar | 29g |
| Sodium | 520mg |
Frequently Asked Questions
Can I Use Frozen Shrimp for This Honey Garlic Recipe?
Yes, frozen shrimp work perfectly for this recipe. Thaw them completely under cold running water or in the refrigerator overnight before cooking. Pat them thoroughly dry after thawing to achieve proper browning. The cooking time and technique remain identical to fresh shrimp once thawed.
How Do I Know When Honey Garlic Shrimp Is Fully Cooked?
Shrimp are fully cooked when they turn opaque pink throughout and curl into a C-shape. A meat thermometer should read 145°F at the thickest part. Avoid cooking until the shrimp forms a tight O-shape, which indicates overcooking. The entire cooking process takes 5-6 minutes, so timing is crucial for this quick-cooking protein.
What Should I Do If My Sauce Is Too Thin?
If your sauce remains thin after 2 minutes of simmering, continue heating for another 30-60 seconds over medium heat. The honey will concentrate and thicken naturally. If it still seems too thin, mix 1 teaspoon cornstarch with 1 tablespoon cold water to create a slurry, then stir it into the sauce while heating. Avoid adding cornstarch directly, as it will clump.
Can I Make Honey Garlic Shrimp Ahead of Time?
Yes, prepare the sauce up to 2 days in advance and store it in a sealed container in the refrigerator. Cook the shrimp fresh on serving day, then add the prepared sauce in the final step. This setup works well for meal prep when you want to minimize cooking time during busy weeknights. Do not cook the shrimp in advance, as they become tough and rubbery when reheated.
What’s the Best Way to Serve Honey Garlic Shrimp for Guests?
Serve honey garlic shrimp over jasmine rice with steamed vegetables on the side. Arrange the plated dish with shrimp on top of the rice and garnish generously with sesame seeds and chopped green onions just before serving. This presentation looks elegant and cooks entirely in 20 minutes, making it ideal for impressing dinner guests without extensive preparation.
Conclusion
Easy honey garlic shrimp delivers restaurant-quality results in under 20 minutes with just one skillet and simple ingredients. The perfect balance of sweet honey, savory soy sauce, and aromatic garlic creates an irresistible glaze that coats each tender shrimp beautifully. This quick dinner recipe works perfectly for busy weeknights, meal prep, or impressing dinner guests. Follow the exact cooking sequence and timing, and you’ll achieve professional results every time this flavorful honey garlic dish graces your table.
PrintEasy Honey Garlic Shrimp
This restaurant-quality Asian-inspired dish features succulent shrimp glazed with a sweet, savory honey-garlic sauce made with fresh garlic, ginger, and soy for a balanced flavor. Ready in 18 minutes, it’s perfect for a quick yet impressive meal.
- Prep Time: 10
- Cook Time: 8
- Total Time: 18
- Yield: 4 servings
- Category: Quick Dinner Recipes
- Method: Stovetop
- Cuisine: Asian-Inspired
- Diet: Pescatarian
Ingredients
Large shrimp, peeled and deveined, 1 pound
Olive oil, 2 tablespoons
Garlic cloves, minced, 4
Honey, 1/4 cup
Soy sauce, 2 tablespoons
Ginger, minced, 1 tablespoon
Apple cider vinegar, 2 tablespoons
Water, 1 cup (plus more as needed)
Green onions, sliced (optional, for garnish)
Cornstarch, 2 tablespoons
Instructions
Heat olive oil in a large skillet over medium-high heat
Add minced garlic and ginger; sauté until fragrant (30 seconds)
Raise heat to high, add shrimp and 1 cup water
Cook until shrimp are almost opaque, stirring frequently (4-5 minutes)
Combine cornstarch with 2 tablespoons water in a small bowl to make slurry
Add honey and apple cider vinegar to the skillet
Reduce heat to medium, pour in cornstarch slurry
Cook while stirring until sauce thickens and becomes glossy (2-3 minutes)
Add more water 1 tablespoon at a time if sauce becomes too thick
Serve with sliced green onions as garnish
Notes
Use fresh garlic for best flavor; jarred garlic causes seasoning imbalance
For bolder garlic, use olive oil instead of canola during sauté
Use 21-30 count shrimp (larger sizes risk texture issues)
Sauce consistency is key – test with a spatula or use 1-2 extra drops water
Optional: add a splash of rice vinegar instead of apple cider vinegar
Nutrition
- Serving Size: 1 serving
- Calories: 450
- Sugar: 15g
- Sodium: 750mg
- Fat: 20g
- Saturated Fat: 2.5g
- Carbohydrates: 35g
- Fiber: 0g
- Protein: 6g